World champion Magnus Carlsen takes much inspiration from the games of the former champion Emanuel Lasker. Lasker and Carlsen share the ability to manoeuvre at length in approximately level positions, without letting the situation dry up and become devoid of winning prospects. Such a style does not always lead to attractive games, and some of Carlsen’s victories have become so obscure that Viktor Korchnoi even accused the champion of hypnotism.
Nevertheless, as Carlsen has become more confident, his style has evolved. As can be seen from the following game from the powerful Norway tournament which finishes this week, he is beginning to take risks and play in the sharp style of Morphy, Alekhine, Tal and Kasparov.
Alekhine once wrote that if one’s opponent chooses an eccentric opening it is necessary to react, rather than play by rote. The Swedish grandmaster Grandelius here selects an eccentric opening and is punished by a sacrificial attack of which Alekhine himself would have been proud.
Carlsen-Grandelius: Norway Chess, Stavanger 2016; Sicilian Defence
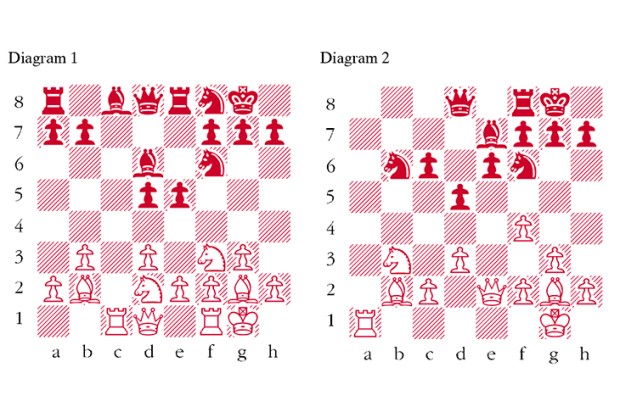
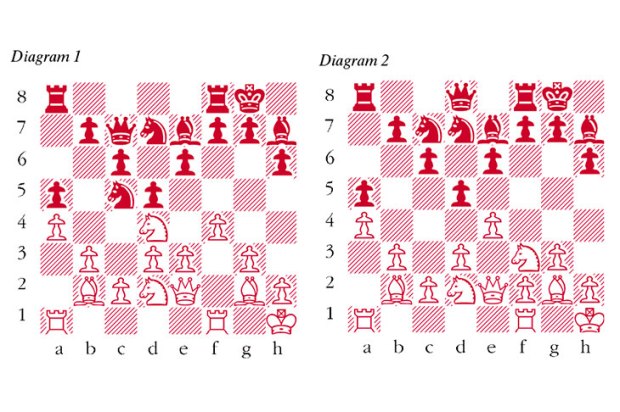
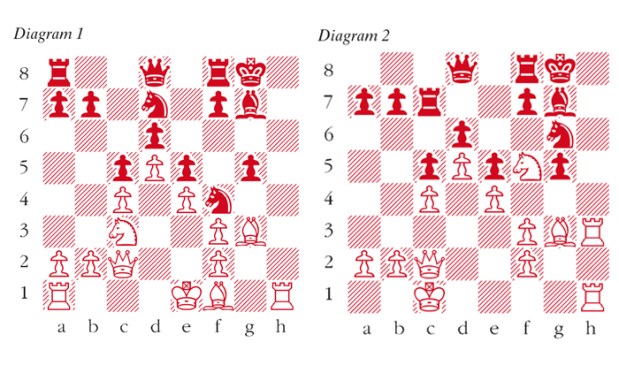
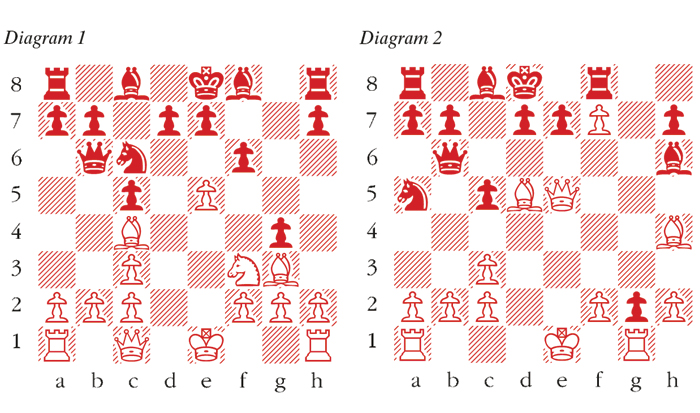
1 e4 c5 2 Nf3 Nf6 An eccentricity introduced by Nimzowitsch. In my opinion it represents one of his less felicitous ideas. After White’s treatment seen here Black is already in difficulties at an early stage. 3 e5 Nd5 4 Nc3 Nxc3 Possible is 4 … e6 but after 5 Nxd5 exd5 6 d4 White has much the freer position. 5 dxc3 Nc6 5 … b6 was seen in Michell-Nimzowitsch, Marienbad 1925 and White reacted with the feeble 6 Bd3, whereas in fact both 6 e6 and 6 Ng5 both leave Black struggling. 6 Bf4 Qb6 7 Qc1 f6 8 Bc4 Strong, natural and improving on 8 Bg3 Zude-Gheng, Staufer 2003. 8 … g5 This move is bold beyond belief, after which we are in uncharted territory. According to Alekhine’s precept, Carlsen is now fully prepared to invest material in refuting Black’s eccentric play. 9 Bg3 g4 (see diagram 1) 10 exf6 Giving up a piece to exploit Black’s self-inflicted weaknesses. 10 … gxf3 11 Qf4 fxg2 12 Rg1 Na5 13 f7+ Kd8 14 Bd5 Bh6 This is catastrophic. Black had to cling on with 14 … d6 15 0-0-0 Kc7 when 16 Bh4 maintains the pressure but is not yet conclusive. 15 Qe5 Rf8 16 Bh4 (see diagram 2) This is the simple refutation. Suddenly Black has no way to defend the e7-square and is obliged to launch a desperate rook sacrifice. 16 … Rxf7 17 Bxf7 Nc6 18 Qg3 Qxb2 19 Rd1 Qxc2 20 Bd5 Qf5 21 Rxg2 Bf4 22 Qf3 Kc7 White’s structure is a bit of a mess and his king is somewhat exposed. However, he is material ahead and Black suffers from an appalling lack of development. Carlsen mops up easily. 23 Rg5 Qf8 24 Bg3 e5 25 Rh5 a5 26 Rxh7 Ra6 27 Rf7 Qe8 28 Kf1 Bxg3 29 hxg3 Qh8 30 Kg2 Nd8 31 Rf8 Qg7 32 Rh1 Rh6 33 Rxh6 Qxh6 34 Qf6 Qxf6 35 Rxf6 d6 36 Kf3 b5 37 g4 Kd7 38 Rh6 Black resigns
Got something to add? Join the discussion and comment below.
You might disagree with half of it, but you’ll enjoy reading all of it. Try your first month for free, then just $2 a week for the remainder of your first year.