I have been bragging incessantly about my team’s success in the Gold Cup. What an extraordinary comeback we made taking 69 imps back in the last eight boards. I may have even mentioned it to the local newsagent. Well – that was then. After three weekends of Premier League not only didn’t we win, we have been relegated. NOT a good look.
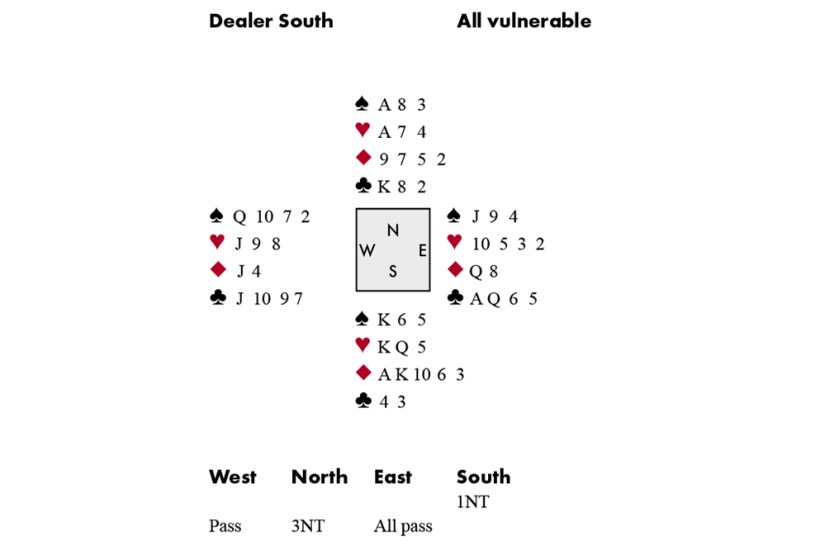
The event was won by Andrew Black’s team – many congrats to them. Today’s hand features David Gold showing us the importance of making a plan (see diagram).
The contract was the same at all 8 tables in Division 1, as indeed was the lead of the ♣️J, and all except one table made. The hand looks ice cold and it’s hard to see how anything could be of interest; the defence takes four tricks in Clubs, and Declarer has the rest. But that’s before you put a world-class player like Gold in the East seat. The ♣️J was allowed to hold, but the continuing ♣️10 must be covered as the Ace could be with West. David won the Ace and also cashed the Queen, but then didn’t take the last Club. Why? Because against 3 NT we need five tricks, not four, and the last Club can be cashed by either defender if they get in. Instead he switched to the ♦️Q, and now look at it from declarer’s point of view. He doesn’t need five tricks in Diamonds – four will do – and if this is a singleton Queen, it would be a disaster if West got in with Jxx to take the presumed remaining two Clubs. So South very reasonably ducked the ♦️Q, and now David took the last Club for one off.
Got something to add? Join the discussion and comment below.
You might disagree with half of it, but you’ll enjoy reading all of it. Try your first month for free, then just $2 a week for the remainder of your first year.