On Saturday 5 March the 134th Varsity Match between the teams from the Universities of Oxford and Cambridge takes place at the Royal Automobile Club, Pall Mall. As has become traditional, the annual clash between our premier academic institutions is supported by Henry Mutkin, the doyen of the RAC chess circle. The scores so far are 58 wins to Cambridge, 53 to Oxford with 22 draws. Spectators are welcome, although standard dress rules for London clubs are in force.
It is a source of constant bemusement to me that although Cambridge award half-blues for representation in the Varsity Match, Oxford still deny that honour to their chess representatives. Given Oxford’s great chess tradition, which includes grandmasters and British champions such as Adrian Hollis, John Nunn, Jon Speelman, George Botterill and Peter Lee, it is strange that the university authorities continue to deprive their outstanding chessplayers of due recognition.
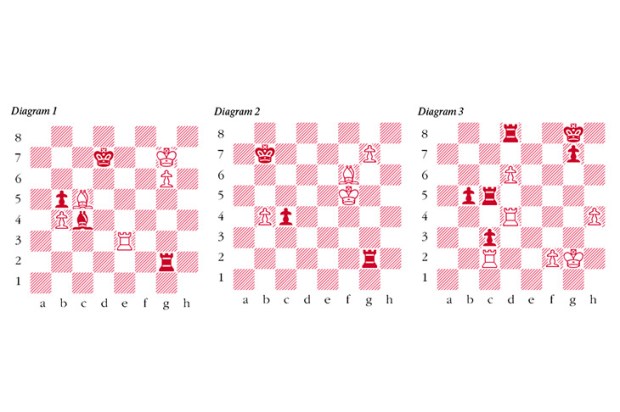
This week a game between two former top boards from the Oxford and Cambridge sides and a puzzle from the Varsity Match of 2013.
Keene-Lee; County Match 1970; King’s Indian Defence
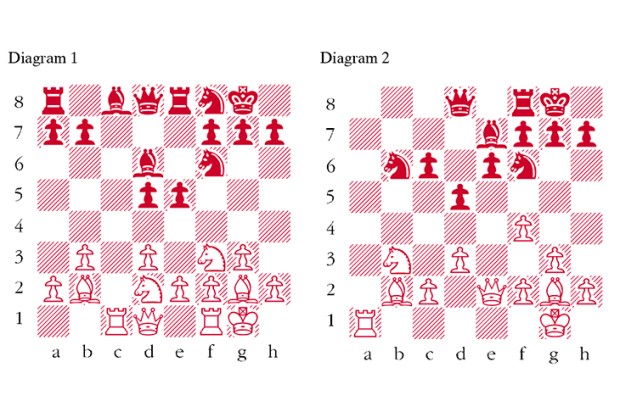
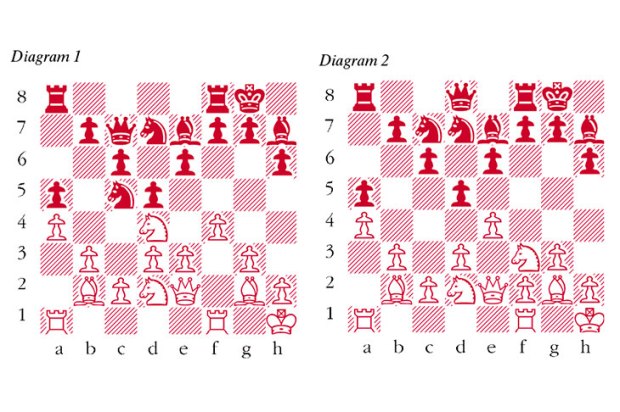
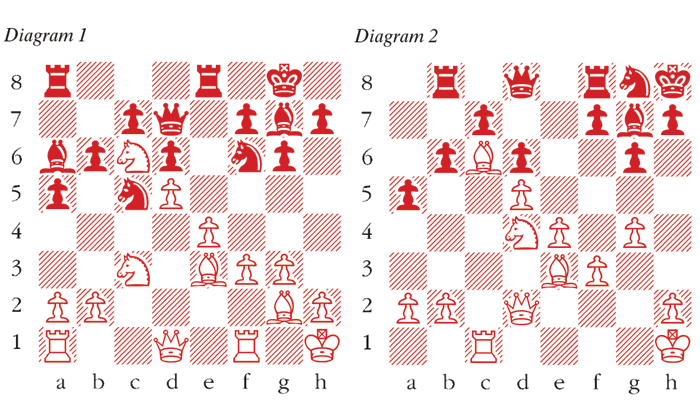
1 Nf3 g6 2 c4 Bg7 3 d4 Nf6 4 g3 0-0 5 Bg2 d6 6 0-0 Nbd7 7 Nc3 a6 Unusual, but cunning. Black’s intention is to meet 8 e4 with 8 … c5 9 d5 b5 gaining active play for his pieces on the queenside. 8 d5 Since Black’s obvious intention is to play … b5 at some point I decided to manoeuvre a knight towards c6 to take advantage of this. The advance d5 is the necessary preliminary to this operation. 8 … e6 9 e4 Nc5 In the later game Anic-Theon, France 2002, 9 … Re8 was tried. 10 Nd4 exd5 11 cxd5 Re8 12 f3 a5 To secure the position of his knight against the possible threat of b4. 13 Kh1 Qe7 14 Nb3 b6 15 Nd4 Ba6 16 Nc6 The triumph of White’s plan but in the meantime Black has gained considerable activity along the a6-f1 diagonal. 16 … Qd7 17 Be3 (see diagram 1) I was not attracted by moving the rook since Black can invade with his knight on d3, hence my decision to sacrifice the exchange in return for light square control. 17 … Bxf1 Falling in too readily with White’s schemes. The critical line is the explosive 17 … Nxd5 when various complications all work out in Black’s favour. 18 Bxf1 Kh8 19 Qd2 Ng8 20 g4 Rf8 21 Bb5 Qc8 22 Rg1 Nd7 23 Ne2 Ne5 24 Ned4 Nxc6 25 Bxc6 Rb8 26 Rc1 Qd8 (see diagram 2) Black has missed his chance and now White’s pieces dominate the board. 27 Bb5 Bxd4 28 Bxd4+ f6 29 Qc3 Rf7 30 g5 Kg7 31 Bf1 Qd7 32 f4 Qe7 33 Re1 Very strong but 33 e5 was immediately decisive. 33 … Kf8 The last chance is 33 … h6 to undermine the g5-pawn. 34 Bh3 fxg5 35 fxg5 Qxg5 36 Be6 Re8 37 Bxf7 Kxf7 38 Rf1+ Black resigns
Got something to add? Join the discussion and comment below.
You might disagree with half of it, but you’ll enjoy reading all of it. Try your first month for free, then just $2 a week for the remainder of your first year.