I suspect many players perceive the chess board in rich contrast, like a heat map. Glowing bright red are those pieces which are attacked but not defended. A gentler shade applies to pieces which are vulnerable to attack in future, or squares that are ripe for occupation.
In the diagram below, the intrusion 10 Nd5-e7+ is tempting, to win rook for knight. But Wesley So’s stunning move 10 Nf6+ showed an exquisite sense for the soft spots in Black’s position. The key point is that after 10…gxf6 11 Qh6, Black’s awkward clump of pieces have almost no way to influence the f6-square, so Qh6-f6 and Be1-c3 is very hard to meet. It is remarkable that the attack is viable even when White’s supporting pieces have yet to leave the barracks.
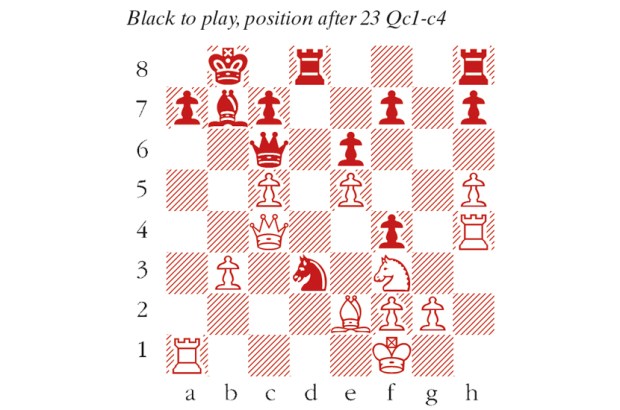
This was a game of ‘Chess 960’ in which the pieces on the back rank are shuffled before the game begins. The start position for this game had: Qa1, Nb1, Rc1, Bd1, Be1, Nf1, Kg1, Rh1. Black’s setup mirrors that: Qa8, Nb8, etc.
Wesley So–Maxime Vachier-Lagrave
Champions Showdown Chess9LX, September 2021
1 b4 d6 2 c4 e5 3 d4 exd4 4 Qxd4 Nc6 5 Qb2 Ne6 6 Ne3 Bg5 7 Nd5 A powerful sacrifice which yields rich strategical compensation. Bxc1 8 Qxc1 O-O Castling rules differ slightly in Chess960: the king stays on g8 and the rook moves from h8 to f8. 9 b5 Ncd8 (see diagram 1) 10 Nf6+ gxf6 No better was 10…Kh8 11 Bc3 (threatening Qc1-c2 or Bd1-c2) 11 Qh6 Bd1-c2 is the immediate threat, but Be1-c3 is the deeper problem. f5 12 Qf6 It is crucial to occupy this square first. 12 Bc3 f6! would let Black off the hook. Ng7 12…c5 13 Bc3 Nd4 14 e3 N8e6 15 h4! prepares the decisive Rh1-h3-g3. 13 Bc3 Nde6 14 h4 The key ingredient. Now 14…h5 15 Rh3 f4 16 e3 wins, as exf4 and Rg3 is inevitable. Bxb5 Preparing Qa8-d8 at any cost. 15 h5 Rce8 16 h6 Qd8 17 hxg7 More efficient was 17 cxb5 Qxf6 18 Bxf6, leaving the Ng7 trapped. The two bishops should comfortably overcome the rook and scrappy pawns. Qxf6 18 gxf8=Q+ Nxf8 19 Bxf6 Bxc4 The bishop is stronger than three pawns, but the win is not straightforward. Black fights back well before stumbling into a mating net. 20 Nc3 b5 21 Rh4 Re6 22 Bd8 c5 23 Bb3 Bxb3 24 axb3 b4 25 Nd5 Ng6 26 Rh3 Rxe2 27 Re3 Rd2 Exchanging rooks was essential. 28 Re8+ Kg7 29 Bf6+ Kh6 30 Ne3 f4 31 Nc4 Rd3 32 Ra8 f3 33 g4 Nf4 34 Rg8 Ne6 35 Ne3 Black resigns.
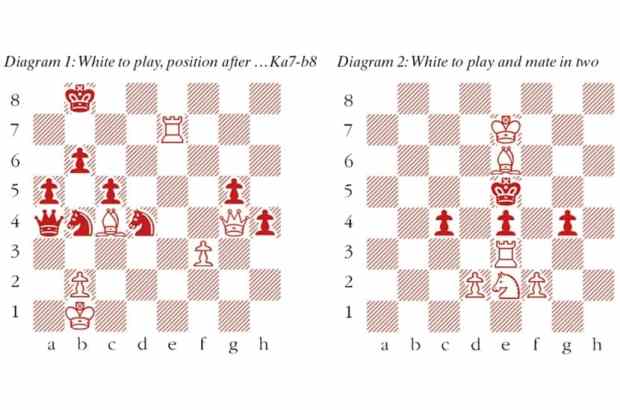
The impotent knights on d8 and e6 recall the finish from this game, Andruet–Spassky, in the diagram below. White’s kingside looks bulletproof, but Spassky’s 28…Qf3! pinpointed the weak squares. White resigned, since after 29 gxf3 Nexf3+ 30 Kh1 Bh3 the threat Bh3-g2 mate is unstoppable (see diagram 2).
Got something to add? Join the discussion and comment below.
You might disagree with half of it, but you’ll enjoy reading all of it. Try your first month for free, then just $2 a week for the remainder of your first year.