A popular conceit among chess authors, particularly dead ones, is to describe a fine game as the execution of a multi-stage plan. In fact, a close inspection often reveals that the plan could only have been mapped out in hindsight, and the loser’s fate was entirely avoidable.
Grand plans are overrated, but modest plans are indispensable. I like to wonder, what would I do with two or three moves? If I could place this piece anywhere on the board, where would it go? What would a prettier version of my position look like? Most of these ideas should be pruned ruthlessly, as they won’t survive contact with the enemy. But when you hit upon something the opponent can’t comfortably prevent, that’s a plan!
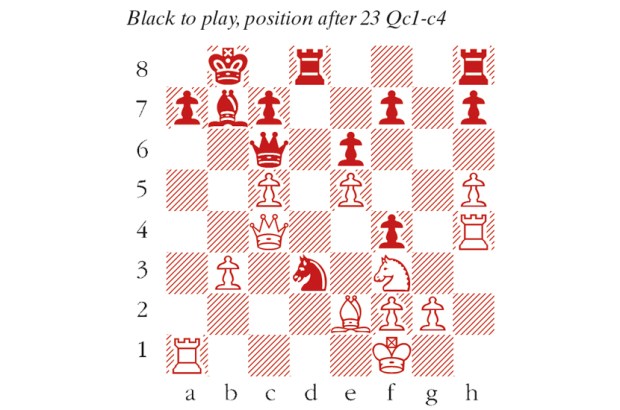
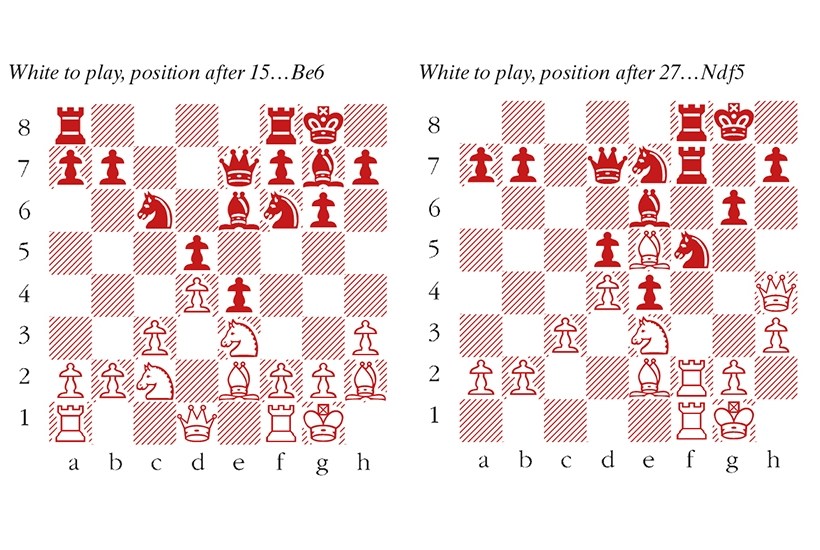
The position shown in the first diagram is calm and quite amenable to planning, so I suspect that Caruana’s ideas might have stretched five or six moves ahead. He probably started by envisaging a key idea for his opponent — to move the Nf6 and make way for f7-f5-f4, with a menacing pawn front. The exchange of pawns with 17 f3 and 18 fxe4 anticipates that, but it’s useful to wait until Black must recapture on e4 with the f5 pawn. There’s no reason to fear the passed pawn on e4, which is firmly blockaded. So Caruana’s 16 Qe1 was a clever waiting move, but one which prepared to gain influence on the kingside with 19 Bf4 and 20 Qg3. He may well have pictured his setup after 22 Raf1, though he could not guess exactly how Shankland would respond. At that point, Black’s position was already uncomfortable, but perhaps not beyond repair. Later on, Caruana’s 28 Ng4! heralded a splendid attacking finish.
Fabiano Caruana–Sam Shankland
Sinquefield Cup, August 2021
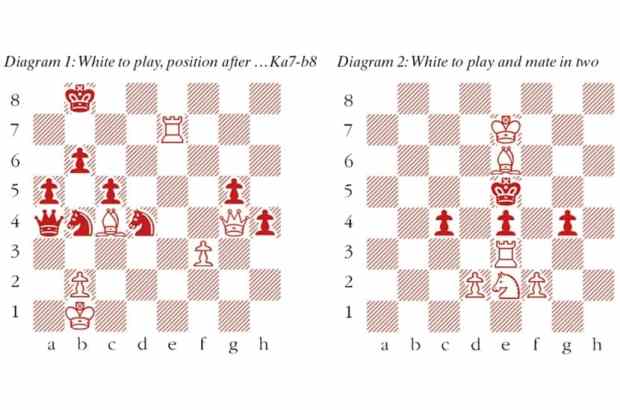
1 d4 Nf6 2 Nf3 g6 3 Bf4 Bg7 4 e3 d6 5 h3 c5 6 Nbd2 cxd4 7 exd4 O-O 8 Be2 Qb6 9 Nc4 Qc7 10 Ne3 Nc6 11 c3 e5 12 Bh2 Qe7 13 O-O e4 14 Ne1 d5 15 N1c2 Be6 (see diagram 1) 16 Qe1 Nd7 17 f3 f5 18 fxe4 fxe4 19 Bf4 Rf7 20 Qg3 Nf6 21 Rf2 Qd7 22 Raf1 Raf8 23 Qh4 Ne8 This allows Ne3-g4, so a better option might have been to wait with 23…Kh8. Then if White plays Bg5 to force a retreat, the exchange of rooks will relieve some pressure. 24 Ng4 Nd6 25 Nce3 Ne7 26 Ne5 Bxe5 27 Bxe5 Ndf5 (see diagram 2) 28 Ng4! Capturing White’s queen allows an elegant mate with Nh6, and now Rxf5 is a threat based on the same idea. 28…h5 29 Qg5 hxg4 30 hxg4 Ng7 31 Qh6 Nef5 32 gxf5 Rxf5 33 Rxf5 Rxf5 34 Rxf5 Bxf5 35 g4! A powerful move, based on the line 35…Bxg4 36 Bxg7 Bxe2 37 Qh8+ Kf7 38 Qf8+ Ke6 39 Qf6 mate. 35…Be6 36 Qxg6 Qf7 37 Qh6 e3 38 Bf3 Black resigns
Got something to add? Join the discussion and comment below.
You might disagree with half of it, but you’ll enjoy reading all of it. Try your first month for free, then just $2 a week for the remainder of your first year.