Two years ago, the brilliant young Polish player Jan-Krzysztof Duda made a baffling decision. In the second game of his knockout match with Wesley So at the Moscow Grand Prix, Duda needed just a draw to advance to the next round, having won the first game with remarkable ease. Perhaps he was mindful that when one only needs a draw, excessively timid play is rarely rewarded. Even so, it was an eccentric choice to employ one of the wildest variations in the Sicilian Dragon. Duda’s risk barometer looked all out of whack — like a diner who has decided the mussels look a bit dodgy, and orders the pufferfish instead. (He went on to lose the game, and later the match.)
Fast forward to this month, and Duda has just won the Fide World Cup, the prestigious marathon knockout event, showing exceptional pragmatism and stability. He took risks, of course, but they looked measured, and he survived the event without a single loss.
His semi-final upset against Magnus Carlsen in a rapid tie-break earned him a spot in the final against Sergey Karjakin, a former World Cup winner and challenger for the World Championship in 2016. Both finalists earn the right to play in next year’s Candidates tournament, whose winner will challenge for the World Championship.
In the decisive game from that final, Duda’s move 15 Ke2 was an outstanding decision, in a position where many players would have castled automatically. Duda correctly judged his king was safe in the centre, and foresaw that it would be ideally placed after a likely exchange of queens.
Jan-Krzysztof Duda — Sergey Karjakin
Fide World Cup, Sochi 2021
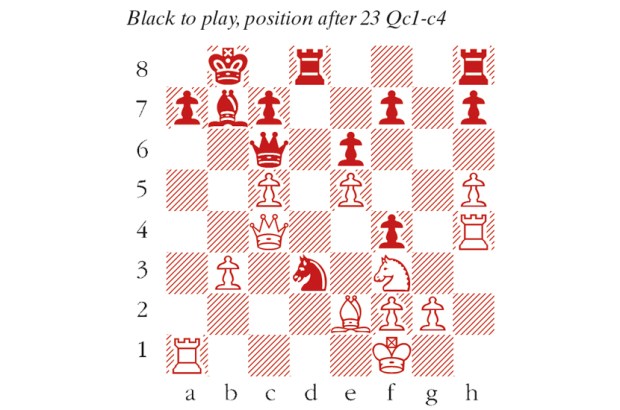
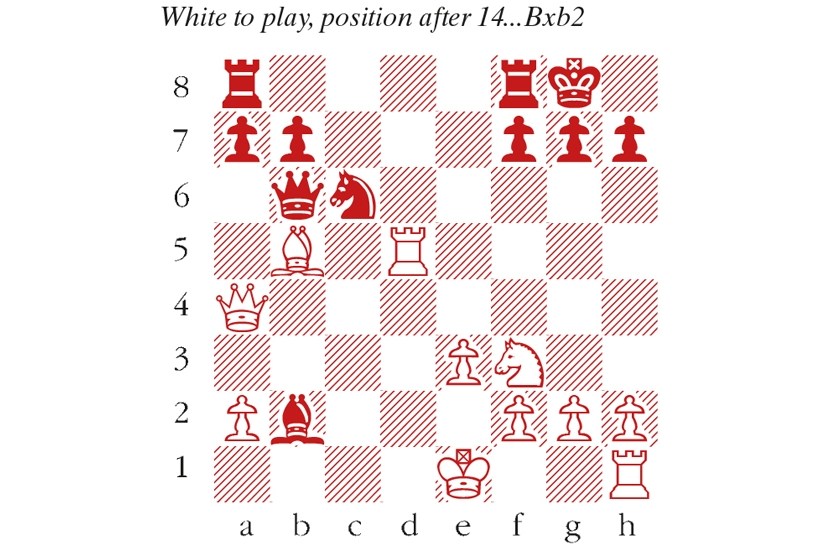
1 d4 Nf6 2 c4 e6 3 Nf3 d5 4. Nc3 c5 5 cxd5 cxd4 6 Qxd4 exd5 7 Bg5 Be7 8 e3 O-O 9 Rd1 Nc6 10 Qa4 Be6 11 Bb5
A pleasant opening for White, with pressure against the isolated queen’s pawn. Qb6 12 Bxf6 Bxf6 13 Nxd5 Bxd5 14 Rxd5 Bxb2 (see diagram) 15 Ke2! Bf6 16 Rhd1 Rac8 17 Bc4 Preparing to target the pawn on f7. Qb4 18 Qb3!
Black would win material after 18 Qxb4 Nxb4, but now the exchange of queens will happen on White’s terms.
Qxb3 19 Bxb3 Nb8 Passive, but 19…Rfd8 20 Rd7 hardly looks preferable. The pawn on f7 is particularly vulnerable in the medium term.
20 g4! Building the initiative on the kingside h6 Duda suggested 20…Na6, as the knight would stand much better on c5. 21 h4 g6 22 g5 hxg5 23 hxg5 Be7 24 Re5 Nc6 25 Rd7!
A crushing blow. Now 25…Nxe5 26 Nxe5 Bxg5 27 Nxg6 is winning for White. For example, 27…Kg7 28 Nxf8 Rxf8 29 Rxb7 a5 30 f4 and Black has no counterplay, so the slow advance of e+f pawns, supported by the king, will win the game.
Bd8 26 Rb5 Na5 27 Bd5 Good enough, due to the threat of Nf3-e5, but the fact that both players missed the simple 27 Rxd8! shows how tired they must have been.
Rc7 A little trap. Here, 28 Rxd8? Rxd8 29 Rxa5 b6 30 Rb5 a6 would put Black right back in the game. 28 Bxf7+ Kg7 29 Rxc7 Bxc7 30 Bd5 Black resigns. Though Black is only a pawn down, he will shed more material soon, e.g. 30…Rf5 31 Nd4!, or 30…Bb6 31 Ne5 and White will gang up on the g6 pawn with Bd5-e4.
Got something to add? Join the discussion and comment below.
You might disagree with half of it, but you’ll enjoy reading all of it. Try your first month for free, then just $2 a week for the remainder of your first year.