The French Defence appears to be somewhat cautious in nature but can in fact lead to disruptive middlegame clashes. It was a favourite of such aficionados of counterattack as Aron Nimzowitsch, Mikhail Botvinnik and Viktor Korchnoi. One of my favourite lines was espoused by world champion Tigran Petrosian, for example in the following win against a world championship candidate. Notes to the following game are based on those in Opening Repertoire: The French Defence by Cyrus Lakdawala (published by Everyman Chess).
Olafsson-Petrosian: Bled 1961; French Defence
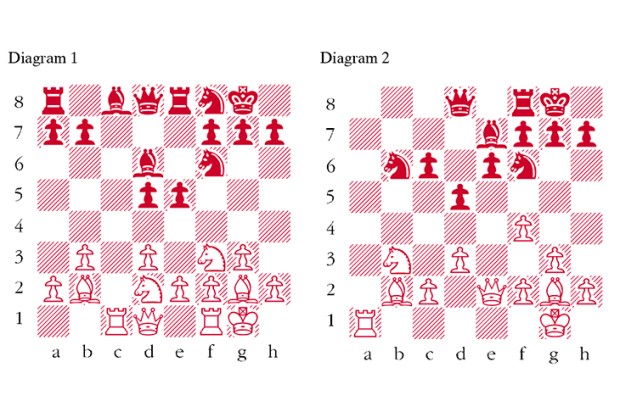
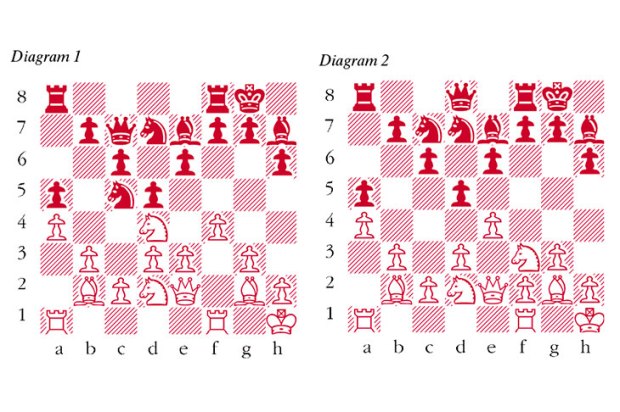
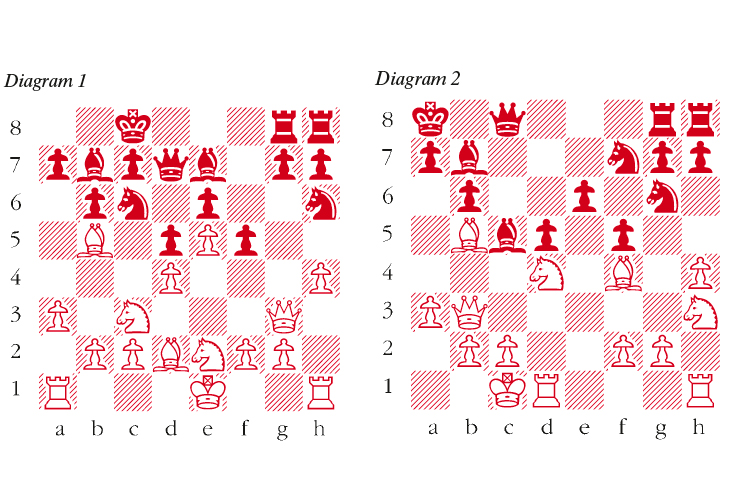
1 e4 e6 2 d4 d5 3 Nc3 Bb4 4 e5 Qd7 5 Qg4 White engages his queen, going for the soft spot on g7. 5 … f5 6 Qg3 b6 7 h4 Bb7 8 Bd3 This is logical now that Black has committed his bishop to b7. If Black now plays … Ba6, he will have lost a full tempo. 8 … Nc6 9 Nge2 0-0-0 10 Bd2 Nh6 11 a3 Be7 12 Bb5 Rdg8 (see diagram 1) Petrosian intends to generate kingside play with the plan … Nf7, … g7-g6, … h7-h6 and eventually … g6-g5. 13 Qd3 White should risk 13 Bxh6! gxh6 14 Qf3 a6 15 Bxc6 Qxc6 16 g3 Rg4. His knights are at least as effective as Black’s inactive bishops, since one of them will perch on f4. Of course, the danger with such a line is that later on the position on the queenside may open and Black’s bishops may take over. 13 … Nf7 14 0-0-0 Kb8 15 Nf4 Qc8 16 Nce2 Ncd8 17 Qb3 The queen is out of play on b3 and may later lose time to … c7-c5 and then … c5-c4. White should play 17 Be3 a6 18 Ba4 c5 19 Qd2 c4 20 c3. 17 … c6 18 Bd3 c5 19 dxc5 Bxc5 Black wins a pawn, but Petrosian falls prey to the positional player’s disease of playing too safely, which reduces his advantage. He should boldly recapture with his b-pawn with 19 … bxc5! 20 Ba6 Nxe5 21 Rhe1 Re8 when White does not have enough for the pawn. 20 Nh3 Olafsson misses an opportunity to go for a dark-square bind with 20 Bc3! which seizes control over d4. 20 … Nxe5 21 Bf4 Ndf7 22 Bb5 Ka8 23 Nd4 Ng6 (see diagram 2) Now Black’s central pawns begin to roll forward. 24 Qa4 Bxd4 By chopping on d4, Black wins a piece on any recapture with … e6-e5. 25 Bd7 Qf8 26 Rxd4 White puts up a better fight by confusing the issue with 26 Bxe6! Be5 27 Bxd5 Bxd5 28 Rxd5. 26 … e5 27 Rb4 exf4 28 Rxb6 Nfe5 Even more efficient is 28 … Qc5! 29 Rb5 Qd6 30 Ra5 Nfe5 31 Rxa7+ Kb8 32 Bxf5 Ne7. 29 Rxb7 This sacrificial lunge at Black’s king is White’s only practical chance. 29 … Kxb7 30 h5 White can keep fighting after 30 Qb5+ Kc7 31 Be6 Qd6 32 Bxd5! Rb8 33 Qa5+ Kc8 34 Ng5 Qb6 35 Qc3+ Qc7 36 Be6+ Kb7 37 Bd5+ Kb6. As scary as it looks for Black’s king, the computer indicates he will eventually consolidate and win with the extra rook.
30 … Qd6 Black’s queen provides her king sufficient coverage to avoid mate and perpetual check. 31 hxg6 Qxd7 32 Qxf4 Nxg6 White resigns
Got something to add? Join the discussion and comment below.
You might disagree with half of it, but you’ll enjoy reading all of it. Try your first month for free, then just $2 a week for the remainder of your first year.