It’s so hard not to whinge when you’ve had bad luck at bridge — it’s just one of those things you’ve got to get off your chest. One thing’s for sure, though, if you’re going to be a moaning Minnie, pick an example that proves your point, not one that betrays the limits of your skill.
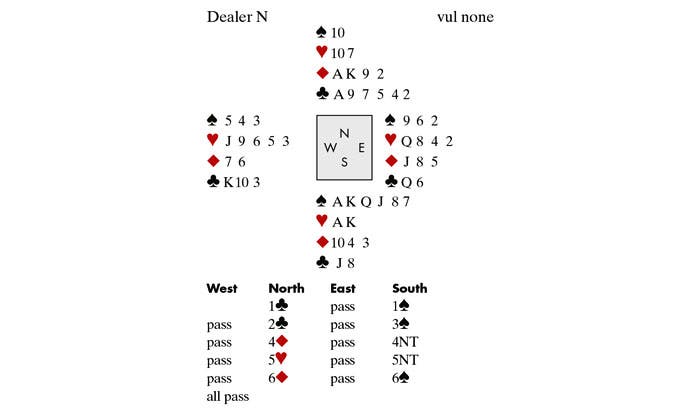
I made that mistake the other day. Sally Brock and I had failed to qualify for the Lady Milne (and, by the way, many congratulations to Fiona Brown and Helen Erichsen, who won the trials). Of course, I made the usual quota of mistakes, but we both felt we’d been unlucky. On the last round, I was the only person to get a problematic lead against 6♠ — and it seemed typical of the whole weekend. Later, I told the brilliant Tom Paske about the hand:
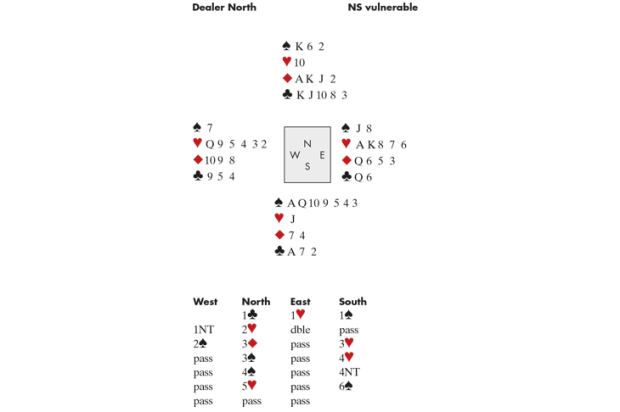
(See diagram)
The ♦7 was led. This took out one of dummy’s entries: any other lead, and I could simply establish clubs. I won the ♦A, drew trumps, played the ♦10 to East’s ♦J and hoped for either a 3-3 diamond break or a diamond-club squeeze against East. Probably not the best line — but I was sure slam was impossible. Not so, said Tom. If you place East with ♦QJxx, you can strip-squeeze her. Win the lead, cash your spades and reach this position. S: ♥A ♦104 ♣J8, N: ♥10 ♦K92 ♣A, E: ♥Q8 ♦QJ8. Now play a club to the ace. If East discards a heart, return to hand with a heart and exit with the ♦10. If she discards a diamond, just duck a diamond. Note that if East holds onto a heart and a club (or two clubs) in the end-position, you cash ♥A first, then play a club to the ace and exit with a low diamond (being sure to unblock the ♦10). I’d still say I was unlucky — not to have Tom’s skill