Joseph Henry Blackburne was the leading British tournament player towards the end of the 19th century. It could be said that he challenged Steinitz for world matchplay supremacy, though he could not hold his own with the great Austrian strategist.
A monumental new book by chess scholar Tim Harding represents a huge contribution to chess literature. Harding has produced a full biography with many games, and has done far more than just reproduce 19th-century commentary. In this week’s game he pinpoints a critical fulcrum, missed by previous commentators, where Blackburne could have seized the advantage. If I have one regret about this splendid volume, it is the near absence of complete crosstables of Blackburne’s superlative tournament performances, such as his astounding first prize at Berlin in 1881. Despite this, no good chess library can afford to be without this book.
Steinitz-Blackburne: London match (Game 1) 1876; Ruy Lopez
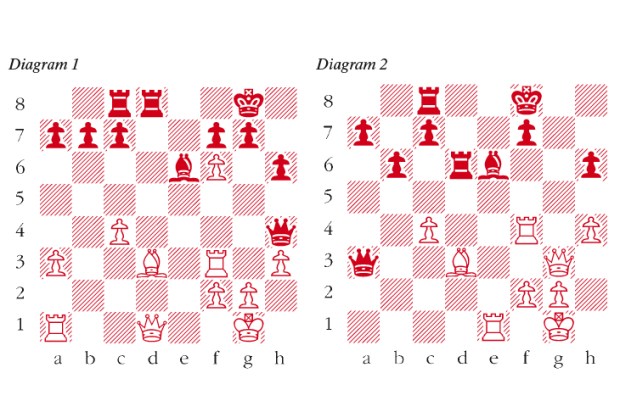
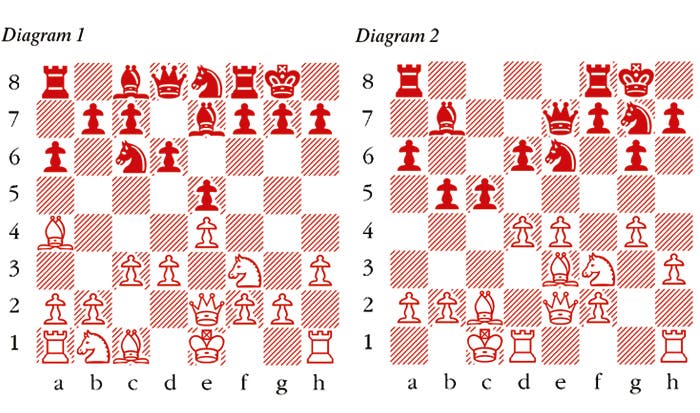
1 e4 e5 2 Nf3 Nc6 3 Bb5 a6 4 Ba4 Nf6 5 d3 d6 6 c3 Be7 7 h3 0-0 8 Qe2 Ne8 (see diagram 1) 9 g4 Continuing the plan begun at move 7, but weakening the kingside. 9 0-0 and 9 Nbd2 are safer options. 9 … b5 10 Bc2 Bb7 This bishop would probably be better placed for attack and defence on the e6-square. 11 Nbd2 Qd7 12 Nf1 Nd8 13 Ne3 Ne6 14 Nf5 g6
15 Nxe7+ Qxe7 16 Be3 16 Bh6 N8g7 17 h4 is more direct but leads to nothing after 17 … f6. 16 … N8g7 17 0-0-0 c5 18 d4 This advance was widely praised but actually there is a serious flaw in the calculations. 18 … exd4 19 cxd4 (see diagram 2) 19 … c4 This is the fulcrum of the game. Much the best continuation here is 19 … cxd4 20 Nxd4 Rac8 when White should probably reconcile himself to 21 f3 d5 after which Black has absolutely no problems. In fact White may suffer due to his kingside advances now that Black has freed his game. The key point of Black’s play is that the natural 21 Kb1 runs into Nxd4 22 Rxd4 (22 Bxd4 Rxc2 is worse) 22 … Ne6 23 Rdd1 and now after 23 … Rxc2!
24 Qxc2 Rc8 25 Qd3 Nc5 Black stands much better. 20 d5 Nc7 21 Qd2 a5 22 Bd4 f6 23 Qh6 b4 Black has no time for this but even after a defensive move such as 23 … Nge8 or 23 … Qd7 he would probably not be able to withstand the white attack. 24 g5 f5 Complete collapse. Relatively best was 24 … Nge8 25 gxf6 Nxf6 26 Rhg1 Qg7 to exchange queens. 25 Bf6 Qf7 26 exf5 gxf5 27 g6 Qxg6 28 Bxg7 Qxh6+ 29 Bxh6 Rf6 30 Rhg1+ Rg6 31 Bxf5 Kf7 32 Bxg6+ hxg6 33 Ng5+ Kg8 34 Rge1 Black resigns