There are some odd opening moves in chess, such as 1 a3 and 1 g4. The former was used by Adolf Anderssen to win a game against Paul Morphy in their 1858 match, while the latter has been developed into an entire system by the English international master Michael Basman. Perhaps the weirdest of all is 1 h4, the topic of a new book, Shuffleduck, by Ken Norbury. It is conceivable that it might be possible to weld 1 h4 into a kind of system, as Basman has done with 1 g4. However, this book points out how an early h4 can form part of a strategic design, in particular when Black has fianchettoed his king’s bishop. This week I annotate the earliest example I can find of this strategy.
Steinitz-Paulsen; Vienna 1873; Dutch Defence
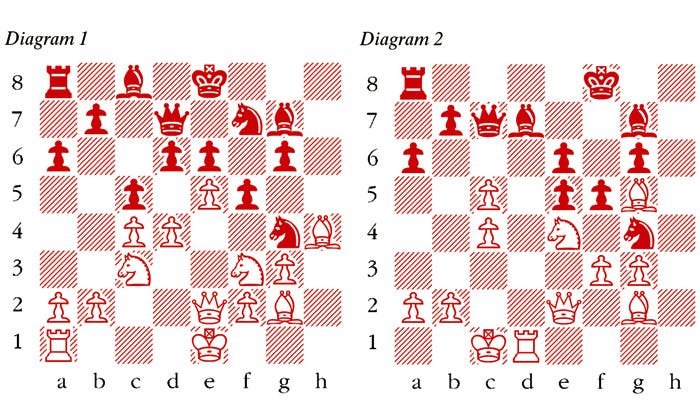
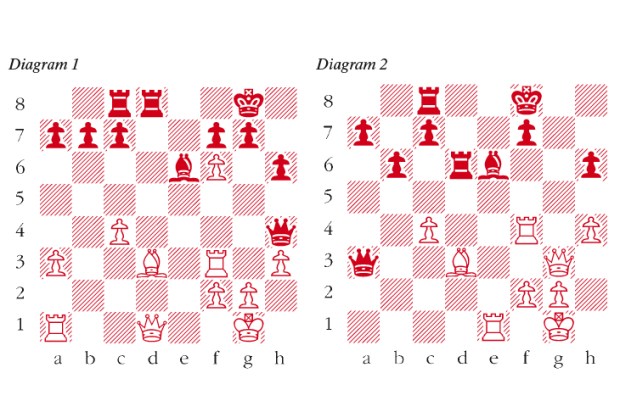
1 c4 d6 2 d4 g6 3 Nc3 Bg7 4 Nf3 f5 5 g3 Nh6 Interestingly, this eccentric development of Black’s king’s knight was also to be adopted in later games by the same Michael Basman who espoused 1 g4. Here Black is operating with the extra risk that White can launch an immediate strike down the h-file. This Steinitz promptly does. 6 h4 A cognate example by a subsequent world champion was the game Botvinnik-Gligoric, Moscow Olympiad 1956 which went 1 c4 g6 2 g3 c5 3 Bg2 Bg7 4 Nc3 Nc6 5 Nf3 Nh6 6 h4 d6 7 d3 Rb8 8 h5 Bd7 9 Bxh6 Bxh6 10 hxg6 hxg6 11 Qc1 when Black’s position is defensible, but difficult, given that 11 … Bxc1? fails to 12 Rxh8 mate. 6 … Nf7 7 h5 e6 8 e4 Nd7 9 Bg2 a6 10 Be3 Nf6 11 hxg6 hxg6 12 Rxh8+ Nxh8 13 e5 Energetically driving a wedge into the black position. However, Black can still maintain his head above water. 13 … Ng4 14 Bg5 Qd7 15 Qe2 Nf7 16 Bh4 c5 (see diagram 1) Given his lack of development Black should not open the position up in this way. Best is 16 … dxe5 17 dxe5 c6 when Black’s position is perfectly playable. Note, however, that the pawn grab with 17 … Ngxe5 fails to 18 Nxe5 Bxe5 19 Rd1 when White has a winning attack. 17 dxc5 dxe5 If 17 … dxc5 then 18 Ng5 Nxg5 19 Bxg5 Bxe5 20 Rd1 Qc7 21 Bf3 is very strong. 18 Ng5 Nxg5 19 Bxg5 Qc7 20 Ne4 This is the strategic death blow. This locks in Black’s kingside pieces and leaves White in total command of the situation. 20 … Kf8 21 0-0-0 Bd7 22 f3 (see diagram 2) 22 … fxe4 Allowing the opening of the f-file against his king renders Black’s position hopeless. 22 … Nh6 was the best chance. 23 fxg4 Be8 24 Qf2+ Kg8 25 Bxe4 Rc8 26 b3 Bf8 27 Qf6 Bg7 28 Qxe6+ Bf7 29 Qxc8+ Neatly transposing into an endgame where he is several pawns ahead. 29 … Qxc8 30 Rd8+ Qxd8 31 Bxd8 Be6 32 Bxb7 Bxg4 33 Bxa6 e4 There is no real reason for Black to continue and he could happily have given up here. 34 c6 e3 35 Ba5 Be5 36 Be1 Bf3 37 Bb5 Kf7 38 c5 Ke7 39 b4 g5 40 Ba4 Kd8 41 b5 Kc8 42 b6 e2 43 Bb5 g4 44 Ba6+ Kb8 45 c7+ Bxc7 46 bxc7+ Kxc7 47 Bb5 Black resigns