The Tradewise Masters in Gibraltar has been won by the American grandmaster Hikaru Nakamura, with the British co-champion David Howell in clear second place. This is possibly a career best for Howell, whose forte turned out to be remarkable resilience in difficult endgames. Last week the puzzle showed Nakamura defeating the pre-tournament favourite and highest ranked competitor, Veselin Topalov. This week’s game from Gibraltar is a fine win by a grandmaster who was trained in the classical Soviet tradition.
Sutovsky-Spraggett: Tradewise Gibraltar Masters 2015; Centre Counter
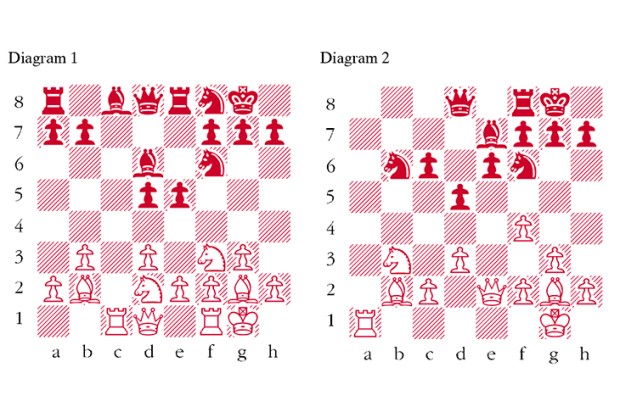
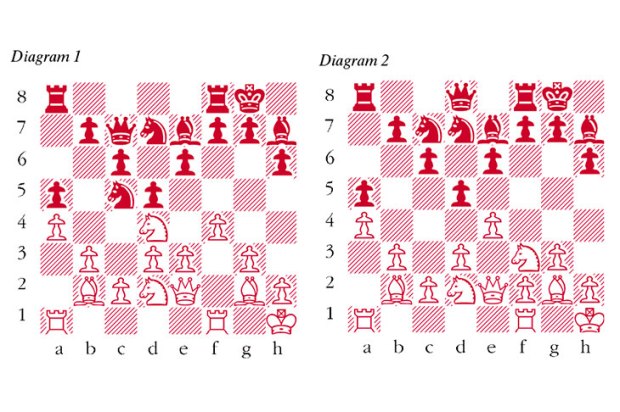
1 e4 d5 Although the Centre Counter has notched some notable scalps, including that of Anatoly Karpov against Bent Larsen at Montreal 1979, I cannot help feeling that the entry of Black’s queen at such an early stage, where it can be attacked, is open to suspicion. 2 exd5 Qxd5 3 Nc3 Qd6 This has recently become fashionable. The traditional way to rescue the black queen is 3 … Qa5. 4 d4 Nf6 5 Nf3 g6 As events will demonstrate, 5 … c6 is much safer. 6 Nb5 The introduction to a thoroughly original concept. This looks like a beginner’s move but it conceals a profound point. 6 … Qb6 Black could hardly have guessed White’s astonishing reply. 7 Na3 This looks ridiculous since White has expended three moves to redirect his knight to a square which is conventionally regarded as inferior. However, White is about to gain a great deal of time by chasing the exposed Black queen. 7 … c6 8 Nc4 Qd8 9 Nce5 (see diagram 1) The true point of White’s manoeuvre. Although the knight’s peregrinations might have seemed artificial, White is now focusing concentrated force against the weak points in Black’s camp, in particular f7 and later g6. 9 … Bg7 10 Bc4 0-0 11 0-0 Nd5 12 Re1 a5 13 a3 Na6 14 Ba2 White’s attack flows beautifully. The bishop retreats in order that the white c-pawn can drive Black’s knight from its central post. 14 … Nac7 15 c4 Nf6 16 h3 Bf5 17 Be3 Nd7 18 Qb3 Nxe5 19 dxe5 Qc8 20 Bb6 Ra6 21 Rad1 Ne6 In view of the disaster which now strikes, Black would have done well to consider simplification with 21 … Bc2 22 Qxc2 Rxb6 though both the aggressive 23 c5 and the consolidating 23 Re2 maintain White’s advantage. 22 c5 Nf4 23 Ng5 Commencing an adventure which ends well but gives Black counterchances. The simple 23 Nd4 gives White a clear plus. 23 … Nd5 (see diagram 2) 24 Rxd5 This sacrifice reveals the point of White’s play but 24 e6 is safer. 24 … cxd5 25 Qxd5 e6 26 Qd6 Re8 27 g4 Bc2 28 Qd2 h6 The definitive mistake. After 28 … Bh6 Black is still in the game, e.g. 29 f4 Qc6 when 30 Qxc2 fails to 30 … Rxb6 because of the pin on the c-file. 29 Nxf7 Kxf7 30 Qxc2 Rxb6 31 Bb1 Rc6 32 Qxg6+ Kg8 33 Re3 Rxc5 Black resigns After 34 Rf3 Rc1+ 35 Kh2 Rxb1 36 Rf7 mates.
Got something to add? Join the discussion and comment below.
You might disagree with half of it, but you’ll enjoy reading all of it. Try your first month for free, then just $2 a week for the remainder of your first year.