The common feature of the first two games of the World Championship match between Viswanathan Anand and Magnus Carlsen in Sochi has been that play was decided in a major piece endgame consisting of a queen and rook each. I have often maintained that Emanuel Lasker (world champion from 1894 to 1921) has been the role model for Carlsen’s style. Lasker was the leading exponent of such refined endgames where manoeuvring and filigree technique was of particular importance.
In major piece endgames the slightest inaccuracy can spell either reversal of fortune or complete disaster, as we shall see from these extracts.
Anand-Carlsen; World Championship, Sochi (Game 1) 2014
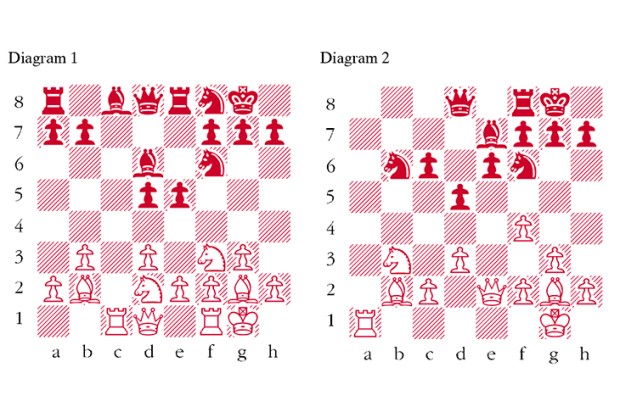
I join the first game (diagram 1) at the crucial stage of the major piece endgame where Anand, having previously had the draw in hand, has now been driven back onto the defensive. The game concluded: 42 … Re2 43 Rb4 b5 44 Qh1 Re7 45 Qd5 Re1 46 Qd7+ Kh6 47 Qh3+ Kg7 48 Qd7+ Draw agreed
However, in the diagram position, Carlsen missed his chance. He should have played 42 … Re3. The first thing to note is that it contains a diabolical trap which forms the topic of this week’s puzzle. The second thing is that by creating the threat of … Rb3 Black will seek to exploit the boxed-in nature of the White king. If Black can immobilise White’s king then the activity of his own king will grant him a virtual extra piece in the concluding endgame. After 42 … Re3 play would continue as follows: 43 Rd7+ Kh6 44 Rxb7 Rb3 45 Rxb3 axb3+ 45 Ka1 Qxh2 with a completely winning position. A tragic missed opportunity.
In spite of this relative setback, Carlsen did not squander his prospects when a second major piece endgame arose in game two.
Carlsen-Anand; World Championship, Sochi (Game 2) 2014
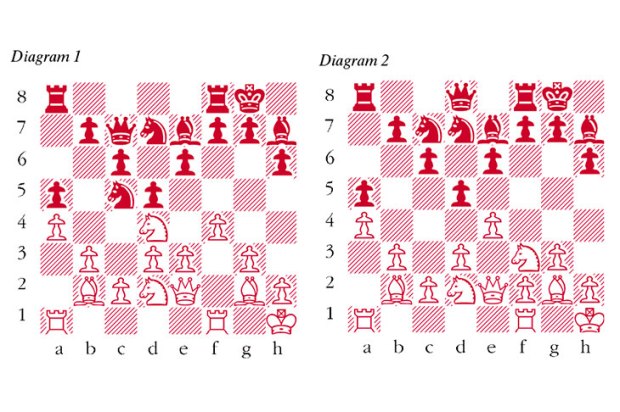
Here again (diagram 2) Anand’s king has been hemmed in and White can base his winning chances on the combination of a direct attack against the black monarch and pressure against Black’s split pawns on the opposite wing. In this position Black’s only hope of resisting consists of the counterattack 34 … Qd2 35 Qxf3 Qxc2 when Black’s position is beyond repair. A sample variation would be 36 Kg2 h6 37 Qb7 Qxf5 38 Rxg7+ Kh8 39 Rc7.
Instead of this Anand chose an end with horror rather than horror without end, blundering with 34 … h5. To my utter astonishment the normally reliable official commentator, grandmaster Peter Svidler, here opined that Black was getting the upper hand because White’s own king was somewhat shut in. However, both he and, evidently, Anand had overlooked White’s next crushing riposte: 35 Qb7 when there is no defence to 36 Rxg7+.
Got something to add? Join the discussion and comment below.
You might disagree with half of it, but you’ll enjoy reading all of it. Try your first month for free, then just $2 a week for the remainder of your first year.