The importance of pawn structure cannot be overestimated when planning chess strategy. Although Philidor (18th century) understood the importance of pawns in chess, in the 19th century the health and safety of one’s pawns was often thrown to the wind in the interests of tactical advantages. However, as chess thinking became more sophisticated and was explained by chess philosophers such as Steinitz, Tarrasch and Nimzowitsch, the crucial nature of the pawn constellation became apparent. In modern grandmaster chess, even the slightest weakness in the pawn armature can be fatal.
This week’s game shows Nimzowitsch, the author of the chess strategic bible, My System, inflicting wound after wound on the white pawn structure against a two-times world championship challenger who seems to have believed, wrongly, that piece activity would always trump the handicap of shattered pawns. The notes are based on those by Steve Giddins in his new Everyman book Nimzowitsch: Move by Move, which takes Nimzo scholarship to a new level.
Bogoljubow-Nimzowitsch: Carlsbad 1929; Nimzo-Indian Defence
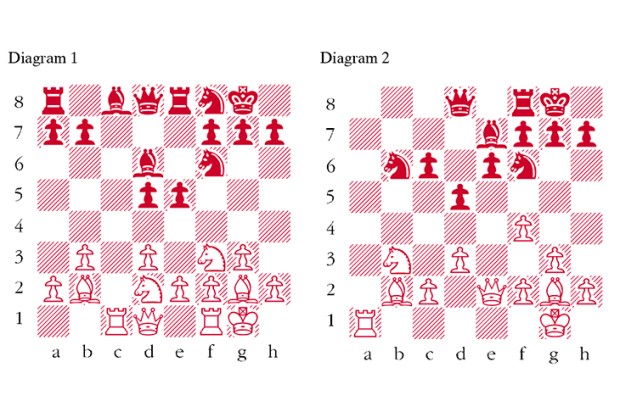
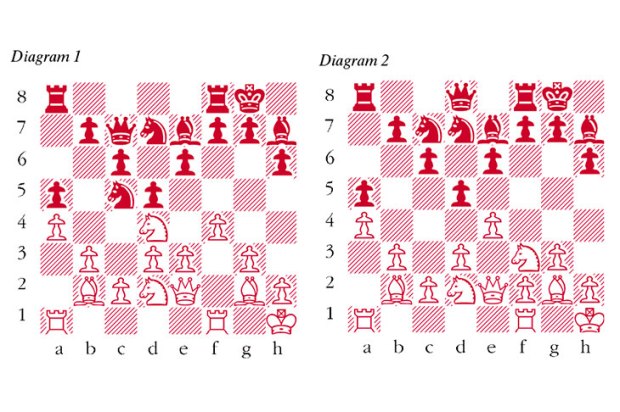
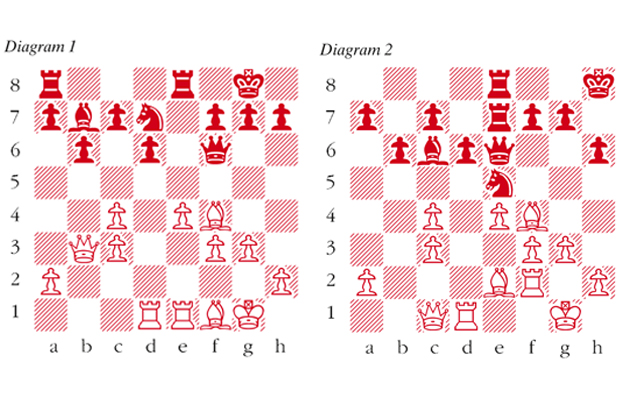
1 d4 Nf6 2 c4 e6 3 Nc3 Bb4 4 Nf3 Bxc3+ 5 bxc3 b6 6 g3 Bb7 7 Bg2 0-0 8 0-0 Re8 9 Re1 d6 10 Qc2 This threatens but it does not work. 10 Nd2 now seems the logical choice, since after 10 … Bxg2 11 Kxg2 e5 12 e4 the e4-pawn is adequately defended after the exchange on d4. 10 … Be4 11 Qb3 Nc6 12 Bf1 e5 13 dxe5 Nxe5 14 Nxe5 Rxe5 15 Bf4 Re8 16 f3 Bb7 17 Rad1 Nd7 18 e4 Qf6 (diagram 1) The key to assessing the position is to ask what White can actually do with his position. The answer is nothing. He has no pawn breaks, and no weaknesses in the black position to attack. Black, on the other hand, has the weak enemy queenside pawns to target and a potential pawn break with … f5. 19 Bg2 Ne5 20 Rd2 Re7 21 Red1 Bc6 22 Rf2 Rae8 23 Bf1 White’s last move allows a tactic: 23 … Nxf3+ 24 Rxf3 g5 and the ‘loose rook’ on f3 means that the bishop is pinned. The white e-pawn would then soon drop off. This should be winning, but Nimzowitsch understood that his position was strategically winning anyway, and he preferred to take things slowly and methodically. 23 … h6 24 Be2 Kh8 25 Qa3 Qe6 26 Qc1 (diagram 2) 26 … f5! 26 … Nxc4 27 Bxc4 Qxc4 28 Bxh6 was what White was hoping for, although 28 … f5 is still much better for Black. Nimzo just carries on with his long-prepared ‘rolling-up’ of the white central structure. 27 exf5 Qxf5 28 Qd2 Qf7 29 Qd4 Capitulation. 29 Bxe5 was the only way to stay on the board but after 29 … Rxe5, White will not succeed for long in holding together his jumble (to call it a ‘position’ is too generous). 29 … Ng6 30 Bd3 Nxf4 31 Qxf4 Qxf4 32 gxf4 Rf8 The rest is a simple mopping-up job. 33 f5 Bd7 34 Rdd2 Bxf5 35 Rfe2 Rxe2 36 Bxe2 Re8 37 Kf2 Re5 38 Rd5 g5 39 Rxe5 dxe5 40 c5 bxc5 41 Ba6 e4 42 a4 Kg7 43 a5 exf3 44 Kxf3 Kf6 45 Ke3 Ke5 46 Bc4 Bg4 47 Ba6 h5 48 Bc4 h4 49 Ba6 Bd1 50 Bb7 g4 White resigns
Got something to add? Join the discussion and comment below.
You might disagree with half of it, but you’ll enjoy reading all of it. Try your first month for free, then just $2 a week for the remainder of your first year.